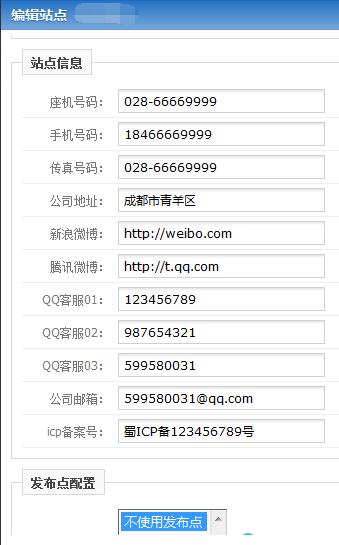
注意:分割线下的方法已被优化,详见:https://gitee.com/jianggle/phpcms/commit/feedd8cbe0ec0af0f55b071844f858761c120941
调用方法:
<?php $SITES = getcache('sitelist','commons'); ?>
<?php $SITE_CUSTOMINFO = string2array($SITES[$siteid][custominfo]);?>
{$SITE_CUSTOMINFO[tel]}
{$SITE_CUSTOMINFO[phone]}
{$SITE_CUSTOMINFO[fax]}
{$SITE_CUSTOMINFO[address]}
{$SITE_CUSTOMINFO[weibo]}
{$SITE_CUSTOMINFO[wechat]}
{$SITE_CUSTOMINFO[qq]}
{$SITE_CUSTOMINFO[email]}
{$SITE_CUSTOMINFO[icp]}
1.打开\phpcms\languages\zh-cn\admin.lang.php(PHPCMS的中文语言定义文件)
查找“site_management”,在上面新建一行,加入新建字段的名称:
$LANG['my_message'] = '站点信息';
$LANG['my_tel'] = '座机号码';
$LANG['my_mobile'] = '手机号码';
$LANG['my_fax'] = '传真号码';
$LANG['my_address'] = '公司地址';
$LANG['my_sina'] = '新浪微博';
$LANG['my_tqq'] = '腾讯微博';
$LANG['my_qq01'] = 'QQ客服01';
$LANG['my_qq02'] = 'QQ客服02';
$LANG['my_qq03'] = 'QQ客服03';
$LANG['my_email'] = '公司邮箱';
$LANG['my_icp'] = 'icp备案号';
同样打开\phpcms\languages\en\admin.lang.php然后加入英文名称:
$LANG['my_message'] = 'sitemessage';
$LANG['my_tel'] = 'tel';
$LANG['my_mobile'] = 'mobile';
$LANG['my_fax'] = 'fax';
$LANG['my_address'] = 'address';
$LANG['my_sina'] = 'sina weibo';
$LANG['my_tqq'] = 'tencent weibo';
$LANG['my_qq01'] = 'QQ01';
$LANG['my_qq02'] = 'QQ02';
$LANG['my_qq03'] = 'QQ03';
$LANG['my_email'] = 'email';
$LANG['my_icp'] = 'icp';
2.修改后台模板文件
打开\phpcms\modules\admin\templates\site_add.tpl.php
搜索“seo_configuration”在“<div class="bk15"></div>”下面新建一行,并加入以下代码:
<fieldset>
<legend><?php echo L('my_message')?></legend>
<table width="100%"  class="table_form">
 <tr>
   <th width="80"><?php echo L('my_tel')?>:</th>
   <td class="y-bg"><input type="text" class="input-text" name="my_tel" id="my_tel" size="30" /></td>
 </tr>
 <tr>
   <th><?php echo L('my_mobile')?>:</th>
   <td class="y-bg"><input type="text" class="input-text" name="my_mobile" id="my_mobile" size="30" /></td>
 </tr>
 <tr>
   <th><?php echo L('my_fax')?>:</th>
   <td class="y-bg"><input type="text" class="input-text" name="my_fax" id="my_fax" size="30" /></td>
 </tr>
 <tr>
   <th><?php echo L('my_address')?>:</th>
   <td class="y-bg"><input type="text" class="input-text" name="my_address" id="my_address" size="30" /></td>
 </tr>
 <tr>
   <th><?php echo L('my_sina')?>:</th>
   <td class="y-bg"><input type="text" class="input-text" name="my_sina" id="my_sina" size="30" /></td>
 </tr>
 <tr>
   <th><?php echo L('my_tqq')?>:</th>
   <td class="y-bg"><input type="text" class="input-text" name="my_tqq" id="my_tqq" size="30" /></td>
 </tr>
<tr>
   <th><?php echo L('my_qq01')?>:</th>
   <td class="y-bg"><input type="text" class="input-text" name="my_qq01" id="my_qq01" size="30" /></td>
 </tr>
<tr>
   <th><?php echo L('my_qq02')?>:</th>
   <td class="y-bg"><input type="text" class="input-text" name="my_qq02" id="my_qq02" size="30" /></td>
 </tr>
<tr>
   <th><?php echo L('my_qq03')?>:</th>
   <td class="y-bg"><input type="text" class="input-text" name="my_qq03" id="my_qq03" size="30" /></td>
 </tr>
<tr>
   <th><?php echo L('my_email')?>:</th>
   <td class="y-bg"><input type="text" class="input-text" name="my_email" id="my_email" size="30" /></td>
 </tr>
<tr>
   <th><?php echo L('my_icp')?>:</th>
   <td class="y-bg"><input type="text" class="input-text" name="my_icp" id="my_icp" size="30" /></td>
 </tr>
</table>
</fieldset>
<div class="bk15"></div>
3.打开\phpcms\modules\admin\templates\site_edit.tpl.php,加入上一步添加的字段:
<fieldset>
<legend><?php echo L('my_message')?></legend>
<table width="100%"  class="table_form">
 <tr>
   <th width="80"><?php echo L('my_tel')?>:</th>
   <td class="y-bg"><input type="text" class="input-text" name="my_tel" id="my_tel" size="30" value="<?php echo $data['my_tel']?>" /></td>
 </tr>
 <tr>
   <th><?php echo L('my_mobile')?>:</th>
   <td class="y-bg"><input type="text" class="input-text" name="my_mobile" id="my_mobile" size="30" value="<?php echo $data['my_mobile']?>" /></td>
 </tr>
 <tr>
   <th><?php echo L('my_fax')?>:</th>
   <td class="y-bg"><input type="text" class="input-text" name="my_fax" id="my_fax" size="30" value="<?php echo $data['my_fax']?>" /></td>
 </tr>
 <tr>
   <th><?php echo L('my_address')?>:</th>
   <td class="y-bg"><input type="text" class="input-text" name="my_address" id="my_address" size="30" value="<?php echo $data['my_address']?>" /></td>
 </tr>
 <tr>
   <th><?php echo L('my_sina')?>:</th>
   <td class="y-bg"><input type="text" class="input-text" name="my_sina" id="my_sina" size="30" value="<?php echo $data['my_sina']?>" /></td>
 </tr>
 <tr>
   <th><?php echo L('my_tqq')?>:</th>
   <td class="y-bg"><input type="text" class="input-text" name="my_tqq" id="my_tqq" size="30" value="<?php echo $data['my_tqq']?>" /></td>
 </tr>
<tr>
   <th><?php echo L('my_qq01')?>:</th>
   <td class="y-bg"><input type="text" class="input-text" name="my_qq01" id="my_qq01" size="30" value="<?php echo $data['my_qq01']?>" /></td>
 </tr>
<tr>
   <th><?php echo L('my_qq02')?>:</th>
   <td class="y-bg"><input type="text" class="input-text" name="my_qq02" id="my_qq02" size="30" value="<?php echo $data['my_qq02']?>" /></td>
 </tr>
<tr>
   <th><?php echo L('my_qq03')?>:</th>
   <td class="y-bg"><input type="text" class="input-text" name="my_qq03" id="my_qq03" size="30" value="<?php echo $data['my_qq03']?>" /></td>
 </tr>
<tr>
   <th><?php echo L('my_email')?>:</th>
   <td class="y-bg"><input type="text" class="input-text" name="my_email" id="my_email" size="30" value="<?php echo $data['my_email']?>" /></td>
 </tr>
<tr>
   <th><?php echo L('my_icp')?>:</th>
   <td class="y-bg"><input type="text" class="input-text" name="my_icp" id="my_icp" size="30" value="<?php echo $data['my_icp']?>" /></td>
 </tr>
</table>
</fieldset>
<div class="bk10"></div>
4.打开后台站点信息修改文件\phpcms\modules\admin\site.php
查找“function add()”,找到其中的“$default_style...”行,在下面新建一行,加入字段获取代码:
$my_tel = isset($_POST['my_tel']) && trim($_POST['my_tel']) ? trim($_POST['my_tel']) : '';
$my_mobile = isset($_POST['my_mobile']) && trim($_POST['my_mobile']) ? trim($_POST['my_mobile']) : '';
$my_fax = isset($_POST['my_fax']) && trim($_POST['my_fax']) ? trim($_POST['my_fax']) : '';
$my_address = isset($_POST['my_address']) && trim($_POST['my_address']) ? trim($_POST['my_address']) : '';
$my_sina = isset($_POST['my_sina']) && trim($_POST['my_sina']) ? trim($_POST['my_sina']) : '';
$my_tqq = isset($_POST['my_tqq']) && trim($_POST['my_tqq']) ? trim($_POST['my_tqq']) : '';
$my_qq01 = isset($_POST['my_qq01']) && trim($_POST['my_qq01']) ? trim($_POST['my_qq01']) : '';
$my_qq02 = isset($_POST['my_qq02']) && trim($_POST['my_qq02']) ? trim($_POST['my_qq02']) : '';
$my_qq03 = isset($_POST['my_qq03']) && trim($_POST['my_qq03']) ? trim($_POST['my_qq03']) : '';
$my_email = isset($_POST['my_email']) && trim($_POST['my_email']) ? trim($_POST['my_email']) : '';
$my_icp = isset($_POST['my_icp']) && trim($_POST['my_icp']) ? trim($_POST['my_icp']) : '';
查找“=>$default_style”在后面加入:
,'my_tel'=>$my_tel,'my_mobile'=>$my_mobile,'my_fax'=>$my_fax,'my_address'=>$my_address,'my_sina'=>$my_sina,'my_tqq'=>$my_tqq,'my_qq01'=>$my_qq01,'my_qq02'=>$my_qq02,'my_qq03'=>$my_qq03,'my_email'=>$my_email,'my_icp'=>$my_icp
同样的在"function edit()”函数里面也加入上面的代码。
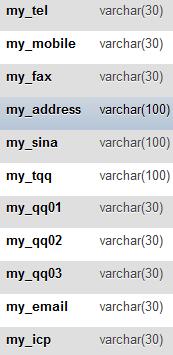
5.修改数据库。打开数据表v9_site,在数据表结构中新建以下字段:

6.调用方法见【phpcms v9小功能小诀窍汇总】第7点
OK,到此就大功告成啦,快来试试吧!

有朋自远方来...评论一下呗O(∩_∩)O